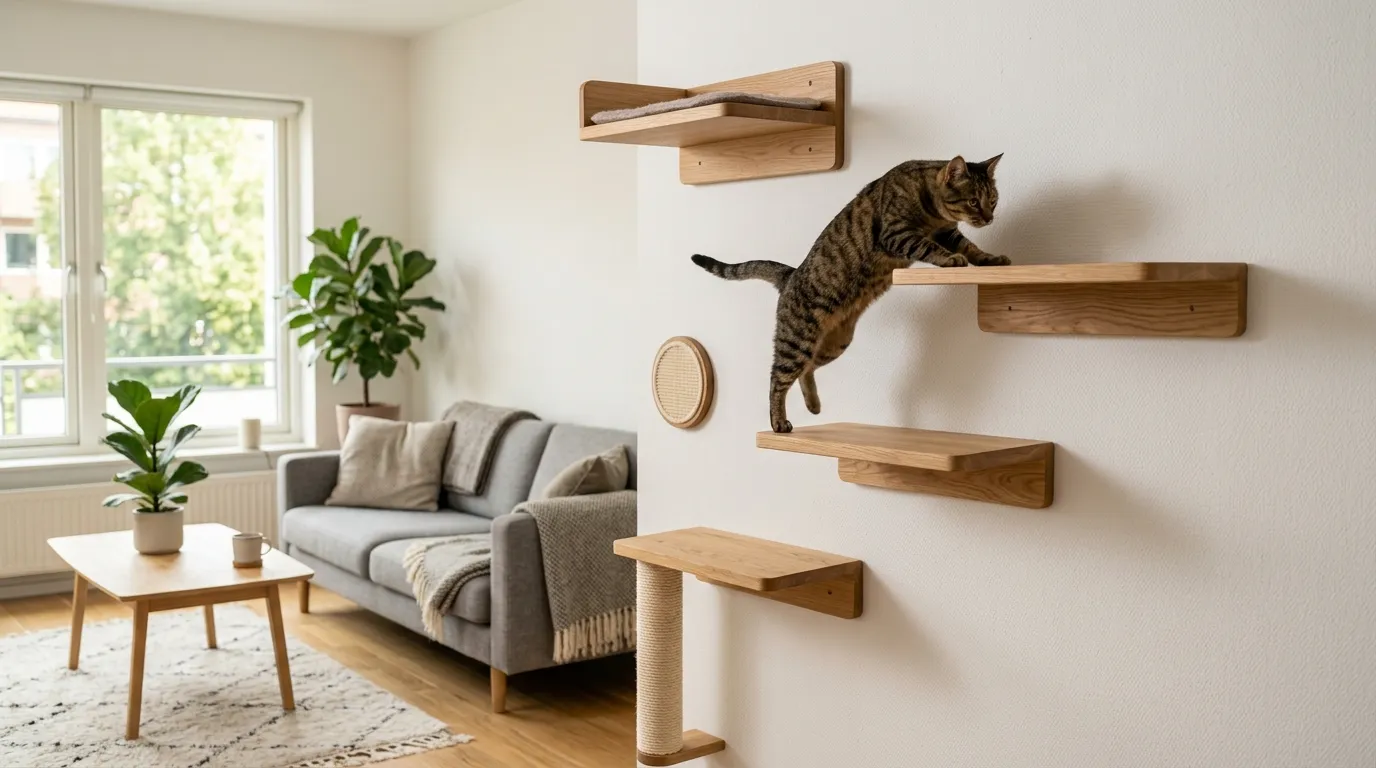
Your cat has taken over every horizontal surface in your apartment and your shelves, counters and sofa back are all unofficial cat furniture now. Learning how to build cat wall for apartment spaces is the cleanest solution because it converts unused vertical wall space into dedicated cat territory without sacrificing a single square foot of floor. I discovered this when my cat started jumping from the bookshelf to the top of the fridge every morning, which told me she wanted height but I had nowhere obvious to put it. A cat wall gives your cat an aerial highway that runs around the perimeter of the room at their level while keeping your furniture for actual furniture purposes. This guide covers planning, installation and the renter-friendly approaches that work in apartments you do not own.
To build a cat wall for an apartment, install staggered floating shelves at varying heights between 18 and 72 inches from the floor using standard wall anchors into studs. Add carpet or sisal covering for grip and connect shelves with ramps or staggered jumps of no more than 18 inches. Renter-friendly options use tension-mounted systems or command strip alternatives for smaller cats.
How to Build Cat Wall for Apartment? Planning the Layout First
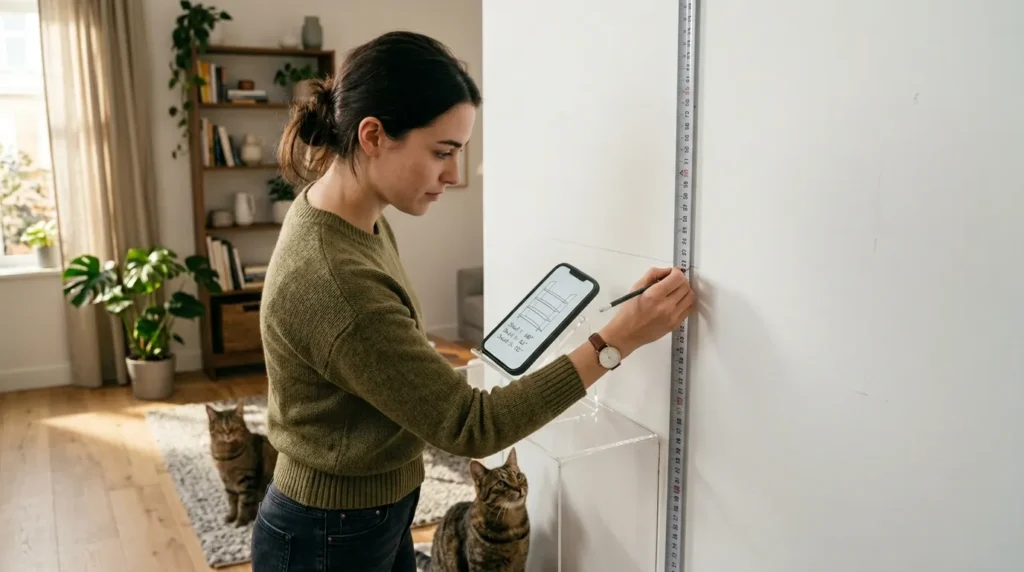
Planning the layout before a single screw goes into the wall saves significant frustration later and it is where most first-time cat wall builders skip too quickly. A cat wall works as a connected system of surfaces your cat can travel between rather than isolated shelves they jump onto and then have nowhere to go. Think of it less like decorating and more like designing a route that your cat can follow from one end of the room to the other without touching the floor.

Start by walking the wall with a tape measure and marking three height zones: entry level at roughly 24 to 30 inches from the floor, mid-level at around 48 to 54 inches and high level at 66 to 72 inches. Your cat needs a comfortable way to get from the floor to the first shelf and a comfortable way down from the highest shelf. A maximum jump gap of 18 inches between any two shelves keeps the system accessible for adult cats without requiring the athleticism of a younger kitten.
Identify where the studs run in your wall before committing to positions because a shelf that sits between studs needs wall anchors rated for significantly more weight than the shelf and cat combined. A standard adult cat weighing ten pounds landing on a shelf creates a momentary impact force of roughly three to four times their body weight. Build for that load, not just their resting weight.
Choosing the Right Shelves and Materials for a Cat Wall
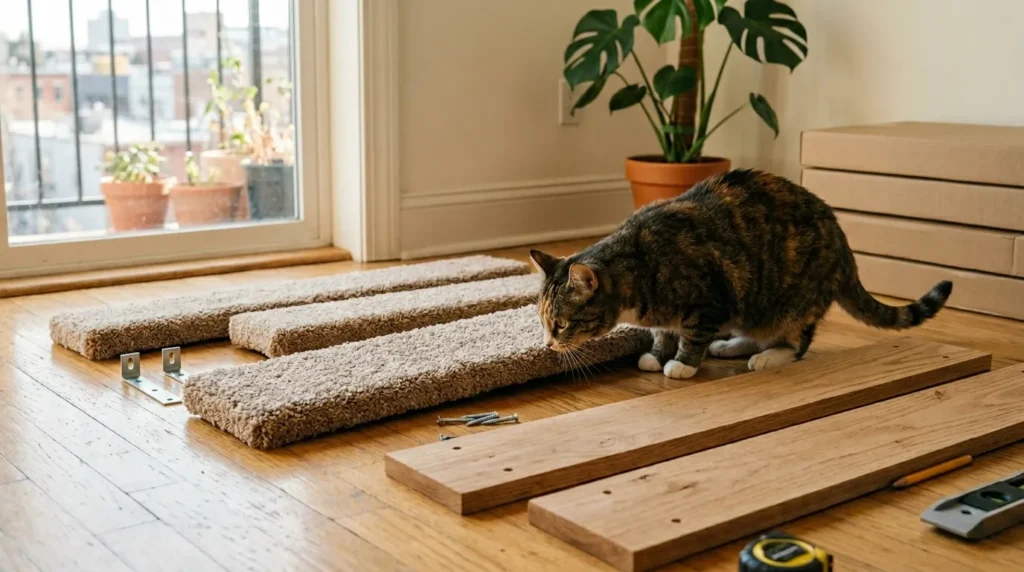
The shelf material you choose determines both aesthetics and safety and these two things do not always align in cat furniture. Standard floating shelves from hardware stores work well structurally but bare wood or laminate surfaces are slippery for cats landing from a jump and slippage on landing is how falls happen. Every shelf on a cat wall needs a non-slip surface covering before your cat steps onto it.
Short-pile carpet offcuts from flooring stores, cork tiles adhesive-mounted to the shelf surface and sisal sheets cut to size are all effective non-slip options. Carpet is the most common because it also satisfies the scratching instinct when a cat stretches on the shelf edge. Avoid rubber-backed bath mats which trap moisture and develop mold on wood surfaces in enclosed apartment spaces.
For shelf depth, aim for a minimum of eight inches to allow a cat to sit facing outward comfortably and a maximum of twelve inches for a shelf that will not dominate the visual space of a smaller apartment. Shelves deeper than twelve inches start to look like actual furniture mounted on the wall which shifts the aesthetic away from the intentional, designed look that makes a cat wall visually appealing rather than just functional.
The Renter-Friendly Installation Approach
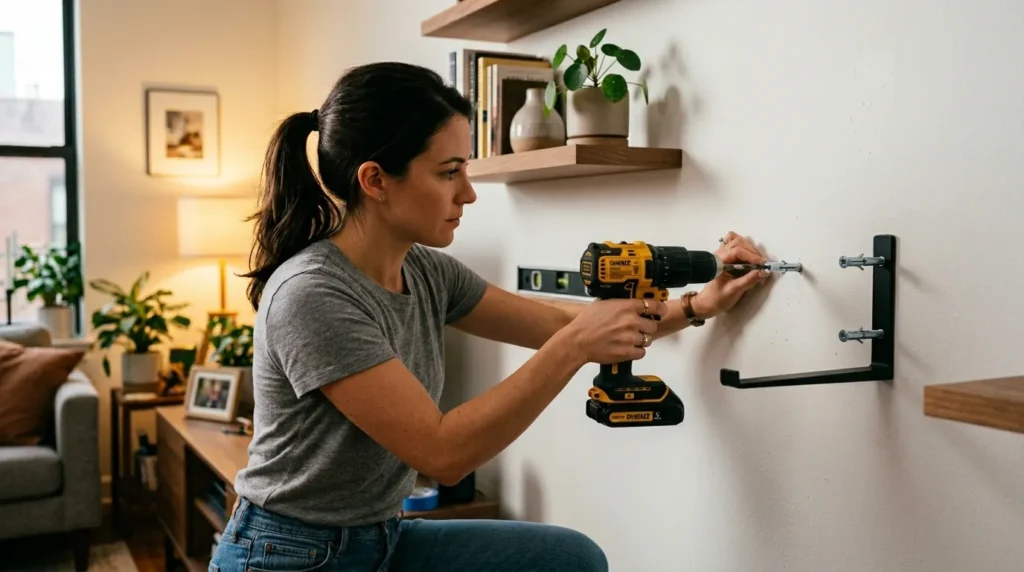
Building a cat wall in an apartment you rent requires balancing structural security with minimizing wall damage and these two requirements pull in opposite directions for heavier shelf loads. The honest answer is that for a full cat wall that your cat will actually use daily and land on repeatedly, you need screws into studs or into wall anchors rated for dynamic load. Command strips and adhesive mounting systems are not adequate for a cat landing from a jump onto a surface they expect to hold their full weight.
What renters can do is minimize damage using the smallest bracket hardware that meets the load requirement and using spackle to fill holes before move-out. Two small screw holes per shelf bracket, filled and painted, are genuinely invisible to most landlords and the cost of touch-up paint is negligible compared to the value of a properly installed cat wall. Document the wall condition with photos before installation and return it to that condition when you leave.
For a fully removable option, freestanding cat wall systems that use tension poles to span floor to ceiling and mount shelves to the poles are widely available now. These require no wall contact, leave no marks and can be repositioned whenever you rearrange furniture. The limitation is that tension systems work best in rooms with standard eight-foot ceiling heights and may not suit very small rooms where the footprint of the tension pole base competes with floor space.
According to the American Association of Feline Practitioners, providing vertical territory in indoor environments is a recognized component of environmental enrichment that directly reduces stress and territorial anxiety in cats. For a full overview of different furniture options that work in apartments specifically, best cat furniture for indoor cats covers wall-mounted, freestanding and tension systems side by side.
Building the Aerial Highway: Connecting Shelves Into a Route
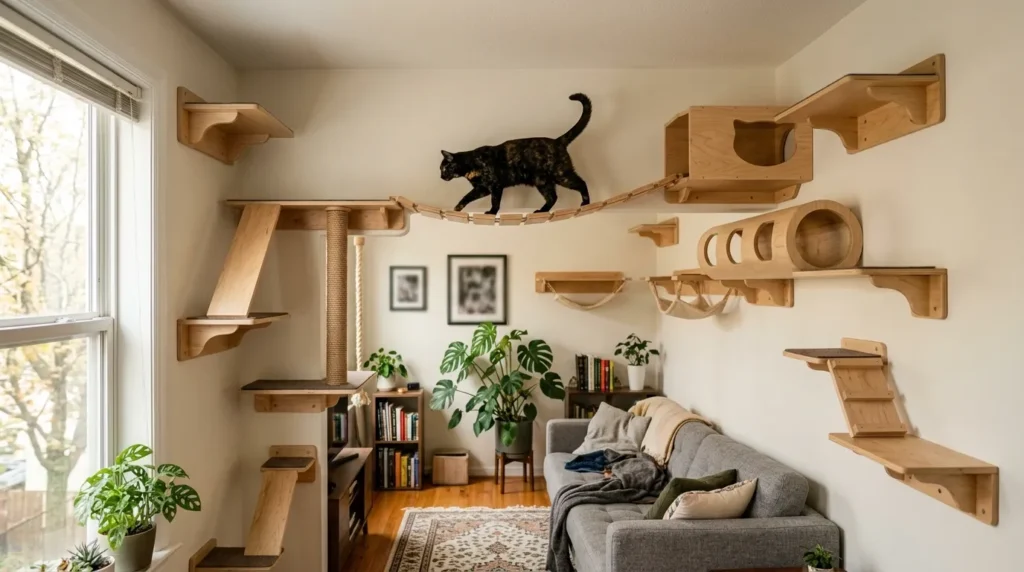
An aerial highway is a cat wall system where every shelf connects to at least one other shelf through a jump or a ramp, allowing a cat to travel the full route without returning to floor level at any point. This is the design goal that separates a truly useful cat wall from a collection of isolated shelves that the cat uses once and ignores. Your cat should be able to get onto the system at one point, travel the full circuit and come down at a different point with multiple route options in between.
Ramps between levels are particularly useful for older cats or kittens because they reduce the impact load on joints compared to landing from a significant drop. A ramp between your mid-level and high-level shelves also means a cat that feels threatened can move quickly between levels without needing to judge a jump accurately while stressed. Build ramps from the same material as your shelves and cover them in carpet cut on a diagonal for grip going both up and down.
The corner transition is the design element most first-time cat wall builders miss. When your route needs to turn a corner, you need either an angled shelf that spans the corner or two shelves positioned close enough to jump between at different heights. A corner shelf installed at 45 degrees is the cleanest solution and it becomes one of the most used spots on the whole system because cats use corners as observation points.
Builder’s Note Map out your full route on paper or in a room planning app before buying any materials. Count the number of shelves, measure the total linear footage and calculate your hardware list before your first trip to the hardware store. I have watched people buy twelve identical shelves and then realize they need four different sizes to make the transitions work. One hour of planning saves three hours of returns.
How to Add Enrichment Features to a Cat Wall?
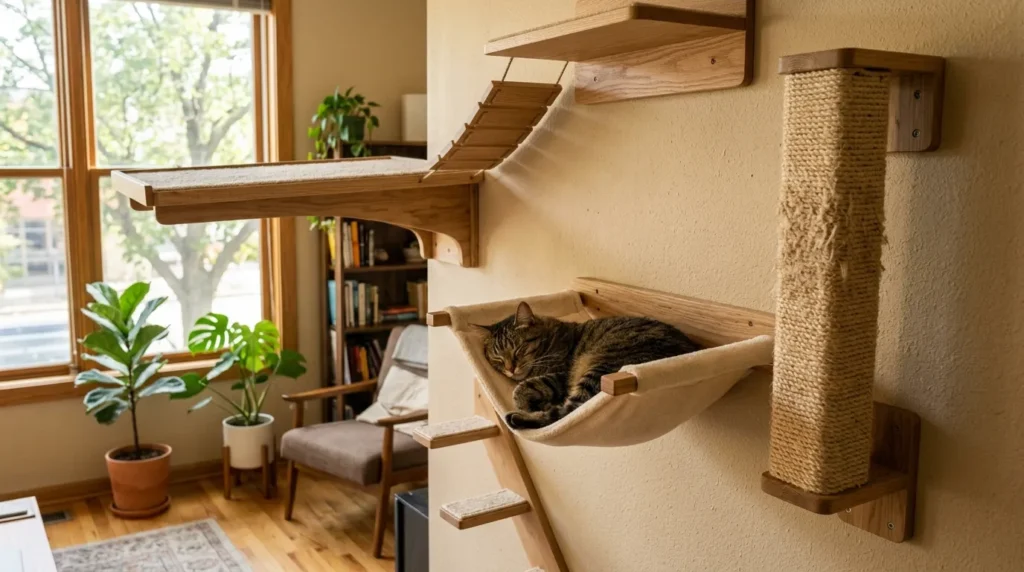
A cat wall with only flat shelves functions but it does not hold your cat’s attention the way a system with varied surface types and enrichment features does. Adding a hammock shelf at mid-level, a sisal post integrated into the route and a wide observation platform at window height transforms a simple cat highway into a full behavioral environment that your cat genuinely lives in rather than visiting occasionally.
Window-height platforms are the highest-value addition you can make because they combine the territorial security of elevation with the mental stimulation of watching birds, squirrels and street activity. Position one platform at exactly window-ledge height and ensure the shelf depth is wide enough for your cat to sit facing the window with their full body supported. This becomes the most used spot on the entire system within the first week.
Hammock perches require a slightly different installation approach because the load is distributed across two mounting points rather than one and the angle of force changes dynamically as the cat moves in the hammock. Use the same stud-mounting logic as your flat shelves and confirm that the hammock fabric is rated for cat weights before mounting. A hammock that fails drops a cat from height and creates a long-term aversion to the whole system.
For a complete guide to building enrichment into your cat’s daily environment beyond just the wall, indoor cat enrichment covers play routines, feeding strategies and mental stimulation that complement the physical space a cat wall provides.
The Most Common Cat Wall Mistake and How to Fix It?
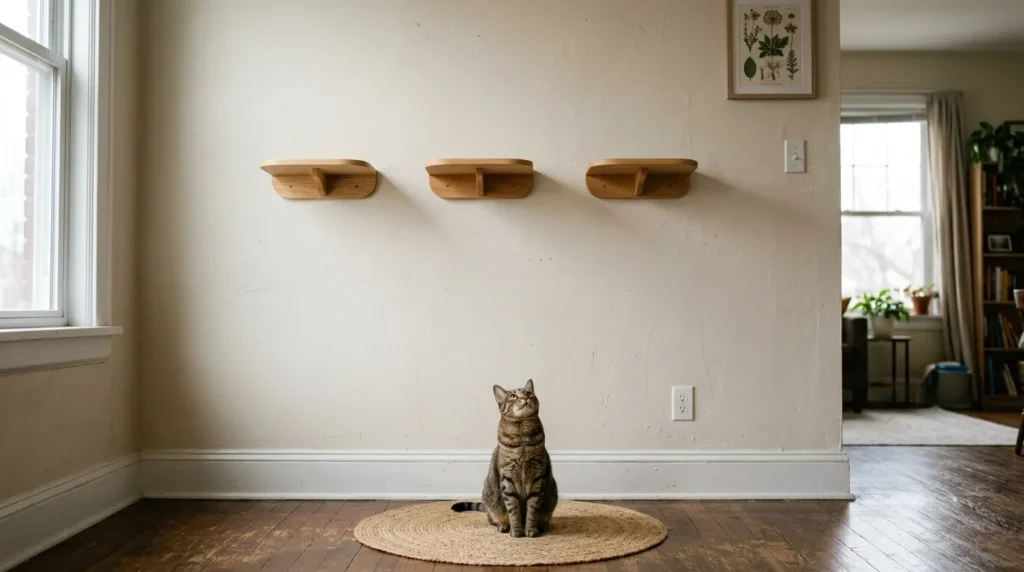
The most common mistake when building a cat wall is installing shelves at the same height across the whole wall without any variation in elevation. Flat same-height shelving gives a cat nowhere to go because there is no route to follow, no high point to reach as a destination and no variety to make repeated use interesting. A cat investigates the shelves once and then never returns because there is no behavioral reward for using them.
The second mistake is building the system in the wrong room. A cat wall in a spare bedroom or a hallway stays unused regardless of how well it is built because cats want height in the rooms where their social life happens. Build it in the living room or wherever you spend most of your time and the cat will use it daily.
The third mistake is skipping the non-slip surface covering on the assumption that the cat will figure out the landing. Cats make jump decisions partly based on what a surface looks like and partly based on what they remember about how it felt before. A slippery first landing teaches a cat not to use that shelf again and it can take weeks of positive coaxing to reverse that lesson.
FAQ
Can I build a cat wall without drilling into the wall?
Yes using tension-pole freestanding systems. They mount to the floor and ceiling with no wall contact and can hold multiple shelves. Weight capacity is lower than stud-mounted shelves so confirm the rating before installing.
How high should cat wall shelves be?
Start your lowest shelf at 24 to 30 inches from the floor and your highest at 66 to 72 inches. Keep jump gaps between any two connected shelves at 18 inches maximum.
What surface should I put on cat wall shelves?
Short-pile carpet, cork tiles or sisal sheets are all good options. Bare wood and laminate are slippery on landing and should always be covered before your cat uses the system.
How many shelves do I need for a cat wall?
A functional single-wall route typically needs six to eight shelves for a ten-foot wall. A full room circuit that turns corners usually needs ten to fourteen shelves depending on the room size.
Will my landlord mind a cat wall?
Shelf screw holes are small and easily filled before move-out. Document wall condition with photos before installing and patch correctly on exit. Most landlords accept this if the repair is done properly.
How do I get my cat to use the cat wall once it’s built?
Place treats on each shelf level when you first install the system. Use a wand toy to guide your cat up the route. Most cats adopt the system within three to five days if there is a food reward on each level initially.
Building a cat wall converts empty wall space into your cat’s primary living environment and it takes one weekend to complete a basic system. Focus on route planning first, install into studs for safety and cover every shelf with a non-slip surface before your cat steps on it. Those three decisions determine whether your cat wall gets daily use or collects dust. Once the system is in and your cat is using it regularly, the full guide to enrichment activities that keep apartment cats mentally engaged lives at indoor cat enrichment.
Building a cat wall for an apartment involves installing staggered floating shelves at heights between 24 and 72 inches from the floor, spaced no more than 18 inches apart for comfortable jumping. All shelf surfaces require non-slip covering using carpet, cork or sisal before use. Shelves must be mounted into wall studs or rated wall anchors to support the dynamic impact load of a landing cat. Renter-friendly alternatives include tension-pole freestanding systems that require no wall drilling. A connected aerial highway route allows cats to travel the full system without returning to floor level, which is the key to sustained daily use.
Written by Mishu
A passionate cat lover and indoor living enthusiast, Mishu is the founder and voice behind Indoor Living Cat – a go-to resource for cat owners who want to create the happiest, healthiest life for their feline companions indoors.
View Full Profile